A plugin named NoScript he installs.
The internet again enthralls.
To the monkey’s delight,
browsing feels right;
He returns to work on sites it mauls.
Get 1000 the game
My dad is a great teacher, not too long ago he taught me this game he was having his class play. To play you need a dice, pencils, and paper.

The game is quite simple, but complicated to master. It works like this:
- Everyone draws a 3 by 3 table.
- The dice is rolled and everyone places the rolled value in one of the empty positions in the table. Everyone has to place the value before the next roll.
- This is repeated until every position in the table is filled.
- To find your result you add your rows.

- The above table would result in the final sum of 123 + 634 + 234 = 991.
- The winner is the player with the result closest to 1000. This means that 1001 beats 990 and 951 beats 1051 and so on. It is the distance from 1000 that matters.
To play decent in this game, some knowledge of addition is required. To play well you also need to figure out when it is best to play risky, and when to play safe. This is much harder than it may look.
I really hope that after reading this you will try to play this with your friends. If you have no friends willing to play nearby, you can try my asynchronous version. There you can start a game, and then send your friends a link to join that game. Then they can play whenever they want within a week.
Go play Get 1000
If you want to rejoin a game, your 10 last game links will be stored in your local browser storage for a week. These will be listed in your game list. If you saved a join link, you can also use that to join a game.
Prepare your Welding Blaster; play Artifact
I made a computer game together with Nils Eriksen Meling and Sven Meling; It is named Artifact; go try it! It plays similarly to Barrack, a favourite game from my youth. In addition to the action and strategy found in Barrack, Artifact also adds an aspect of resource management.

In Artifact, each of 40 levels consists of a screen filled with a variety of different orbs. These orbs must be isolated by you. Once 75% of the playing field has been isolated, the level ends. You are rewarded for playing fast, and for ending the level with a high % of the screen isolated.
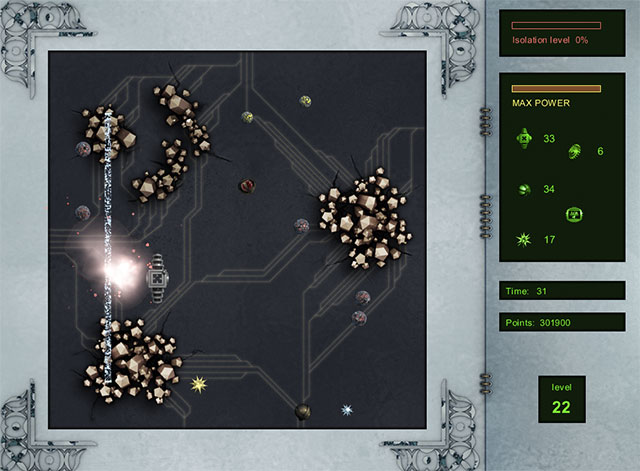
To accomplish your task you control a dual-direction Welding Blaster that can be transformed to fire vertically or horizontally. When fired, a welding beam will slowly traverse the screen in 2 directions. Once both ends reach a wall, the playing field will be cut, isolating balls on each side of the beam. However, care must be taken not to hit the orbs, as they will create a feedback surge, damaging the Welding Blaster.
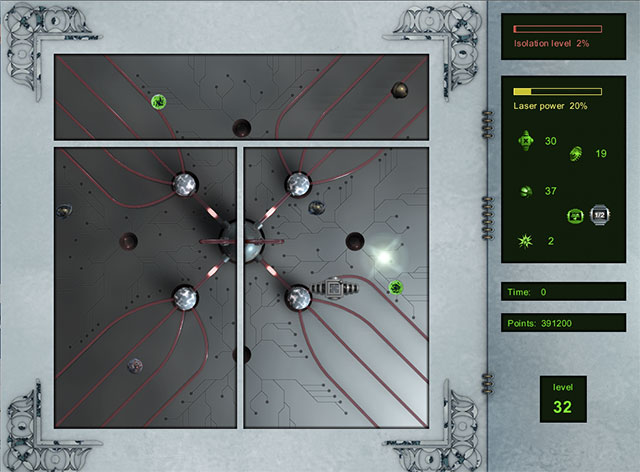
Artifact is free and will stay so, but developing and maintaining it is not free. If you enjoy Artifact, I hope you will consider a donation. However, most of all, I hope you enjoy playing it.
If you have problems with installation on the supported platforms, please send a mail to: .
Useful if caught in overly simplistic space combat
One of my favorite games, and by far the one I used the most time creating content for during my youth is Escape Velocity Nova. The Escape Velocity series are 2D space RPGs, which means there is lots of 2D space combat. In these types of games you typically have three main types of weapons, non-turreted, turreted and homing. Non-turreted and homing weapons are not really that complicated. The non-turreted fire in one direction (typically forward), while the homing weapon typically turns as hard as it can towards the target at maximum speed. Turreted weapons were always a puzzle to me though, they somehow knew where you would be, and fired to intercept your ship. I always wondered how this was done.
Some years later during a visualization class (on how to find intersections between geometric primitives) I was wondering if I could use geometric equations to figure out where a spaceship needs to aim its torpedo, if it knows the position and velocity of the target. Below is the solution I came up with. It assumes constant speed for the target and the torpedo.
The positions of something moving at constant speed, can be described by this equation where  denotes time,
  the current velocity and
  is the starting position. This restricts the position of the target to a line, where the position on the line is determined by .
(1) 
For 2 dimensions this is:
(2) 
The possible locations  of a constant speed (
 ) bullet fired from point
  in any direction, are given by this equation, where again time is denoted by . This restrict the possible positions to a circle which expands with time.
(3) 
For 2 dimensions this is:
(4) 
Now inserting the restrictions on  and
and  from 2 into 4 gives a polynomial that only depends on :
(5) 
Rearranging gives:
(6) 
Simplifying by setting constants  and
and  and moving towards standard form:
(7) 
Rearranging to standard form:
(8) 
This is a quadratic equation, with coefficients:
(9) 
(10) 
(11) 
Solving the quadratic equation gives two solution for , if an answer is positive and has no imaginary part, there is a solution to the problem.
Inserting a solution for in equation 1 gives the  coordinates where the torpedo should be aimed, and where it will hit the target.
Below is an implementation of this, where the constant speed of the torpedo can be set. If there are two solutions, the smallest is chosen. If there is no solution (typically because the target it too fast for the torpedo to catch) the torpedo is never launched.
As you can see in some cases, this does not take into account the size of the target, only the targets center. This can be remedied by using a representative selection of boundary points of the target instead, and firing if one of them would connect.
The solution does also not take into account how fast the target can change direction, or when the torpedo runs out of fuel. This can be handled by not firing if the time from the torpedo is fired to the impact is too long.
This method can also quite easily be expanded for an accelerating weapon or target. This will result in a higher degree polynomial though, which are mostly only possible to solve using numerical methods like Newtons’s method for example.
The van der Corput sequence
Lately I have been looking for a solid way to create a robust implementation moving a spaceship from one point to another. This turned out to be a hard problem, and led me to a lot of new literature, which included Steven M. LaValle’s Planning Algorithms. Randomly reading from it I found a small gem called the van der Corput sequence.
The van der Corput sequence is useful for sampling in an interval. LaValle discusses it as an option to random sampling within the context of sampling for planning algorithms. I had thought about similar issues in the context of root finding, where I always wondered how to predictably generate a sequence that would distribute samples evenly over an interval, as well as do so in a manner that would not “favor” parts of the interval over others.
One naive way to sample over an interval, is to split the interval in X pieces and do the samples in order. If X is 8 and this method is used the interval would be explored as shown to the left in the figure below (clearly this means the the early parts of the interval will be explored first). Using the van der Corput sequence would result in exploration as seen on the right (which explores the interval much more evenly).
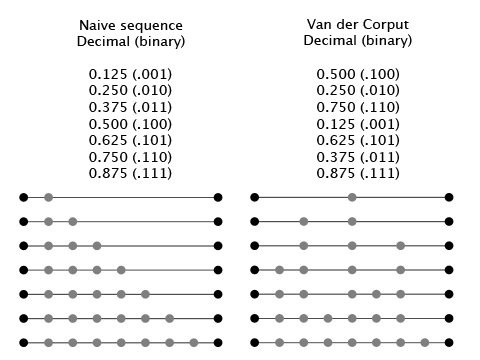
Generating the van der Corput sequence is surprisingly simple and elegant, just flip the bits of the naive sequence as seen in the binary column above. I find this very peculiar, since mirrored donkeys do not normally turn into cheetahs.
The great properties of this sequence is that whenever you end it, it will have explored the interval pretty evenly. A second nice property is that you can easily continue the sequence beyond an initial size, by creating the naive sequence at the position you want to start from, and keep reversing the results.
This method will definitely go into my toolbox of things to consider whenever I am thinking about using random sampling.
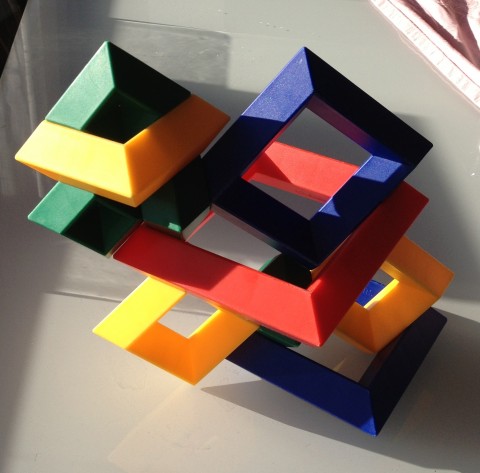
Superb toy!
This toy is incredible. It is reasonably easy to construct things, while still providing a challenge once you get the basics. It is suitable for nearly all ages. It says 3+ but if you remove the smaller parts it is suitable for much younger children even though they might just enjoy tearing down your constructs. The absurd thing is that when they do, you wont hesitate to make another one, since building these are way too much fun.
Tips for more robust GPU programs using C++ and OpenCL
When I started programming for the GPU, I struggled to keep my GPU programs robust. This was partly because I was very new to C++ and C. OpenCL is very low level and this in combination with my inexperience led to a lot of not so robust prototypes. While my code worked for prototypes, it was very cumbersome to code and not very reusable.
In this post I will share some of the solutions I found to some of the issues I had. These deal with allocating and releasing memory on the GPU, as well as converting relatively cleanly between STL vector and GPU memory representation.
Simplifying release and allocation of memory
Basic memory allocating on the GPU using OpenCl is done by using the code below. Where memory is a reference to the memory on the GPU.
cl_mem memory = clCreateBuffer(context, CL_MEM_READ_WRITE,
                               numberOfBytes,NULL, NULL);
To release the memory allocated, the below function has to be called with the memory object as argument.
clReleaseMemObject(memory);
This leads to several ways to leak GPU memory. Especially if your code throws exceptions or does something else which “looses” the reference to the memory object and you forgot to release the memory explicitly.
A way to mitigate this in C++ is to create an object which on initialisation allocates memory, and which when its destructor is called release the memory. This ensures that when the object goes out of scope or is deleted the memory on the GPU is also released. This is basically RAII (Resource Acquisition Is Initialization)
A very basic (leaving out code for copy constructors etc) object for GPU memory would look like this.
class GPUMemory {
private:
    cl_mem memory;
public:
    GPUMemory(size_t e,const cl_context &ctx) {
        memory = clCreateBuffer(ctx, CL_MEM_READ_WRITE, e,
                                NULL, NULL);
    }
    ~GPUMemory() {
        //release if out of scoped or deleted
        clReleaseMemObject(memory);
    }

    /*
     * Copy constructor, copy assignment operator etc goes here
     * implementation should be according to your need
     */
}

// Possible usage
void doAwesomeCalculation (size_t size,cl_context &context) {
       GPUMemory map(size,context);
       // Do calculation, throw exceptions, etc
} // Out of scope so GPU memory is released
This means that you do not have to explicitly release memory for every weird way your application could behave, which avoids a lot of code repetition and leak opportunities. As long as the memory in allocated in the correct scope you mostly do not have to think more about it. It should be noted that you should follow rule of three and implement copy constructor and assignment operator as well. The implementation may wary depending on how you want your object to behave. I’ll leave that for another blog post.
From vector to GPU memory
Vector is a very useful data structure when you want something sent to the GPU and back, since everything is stored adjacently in memory, no fetching or disbursing on the CPU side is needed. To convert a vector to the kind of memory object I designed above, this is the code i use:
template  GPUMemory createAndFillMemory(const vector data,
                                                    cl_context context,
                                                    cl_command_queue queue) {
   cl_int err;
   if(data.size() > 0) {
        GPUMemory mem = GPUMemory(data.size(),context);
        err = clEnqueueWriteBuffer(queue, mem.getMemory(), CL_TRUE, 0, mem.getBytes(),
                                       (void*)&data[0], 0, NULL, NULL);

        if(err != CL_SUCCESS) {
            throw runtime_error("Loading buffer failed");
        }
        return mem;
    }
    throw runtime_error("no content in vector");
}
As you can see the GPUMemory object has been extended to use templates, since the use I want in this case is a generic container for some struct. This saves a lot of code since you would need to do this conversion manually for each different struct you are planning to put on the GPU if you do not have a similar method. It also ensures that you do not make offset or type errors when converting to and from the different representations.
The GPUMemory class has also been extended to contain information about the amount of objects added, as well as type size.
Conversion back from GPUMemory object to a vector is done using this function:
template  vector readBackMemory(GPUMemory &data,
                                           cl_context context,
                                           cl_command_queue queue) {
   vector vec(data.getElements(),T());
   cl_int err;
   if(data.getElements() > 0) {
        err = clEnqueueReadBuffer(queue, data.getMemory(), CL_TRUE, 0, data.getBytes(),
                                  &vec[0], 0, NULL, NULL);
        if(err != CL_SUCCESS) {
            checkError(err);
            throw runtime_error("Content not read back from GPU");
        }
        return vec;
    }
    throw runtime_error("No content in vector");
}
General conversion from a vector containing any object to GPU memory is not something I would recommend. While this is possible using the code above, conversion using these methods should be restricted to primitives and structs of fixed size. You should also avoid pointers, as it makes little sense to send a pointer pointing to objects in CPU memory to the GPU.
There is still room for mistakes as you will see by the following example. When you use memory on the GPU, no metadata carry over from the C++ code. So on the GPU side you are responsible for using the memory you transferred correctly, the methods above only ensure that the copying of memory back and forth from the GPU results in correctly typed and sized arrays.
An example
A simple example can be to copy some particles to the GPU, apply some calculation and then copy the particles back. On the CPU side I then define a particle struct:
struct GPUParticle{
    cl_float3 pos;
    cl_int identifier;
    cl_float3 direction;
};
On the GPU (OpenCL kernel) side, a simple kernel to be applied could look like this:
struct GPUParticle{
    float3 pos;
    int identifier;
    float3 direction;
};

__kernel void copyParticles(
                       global struct GPUParticle * data,
                       global struct GPUParticle * dataOut
                       )
{
    int x = get_global_id(0);
    //do calculation here
    dataOut[x] = data[x];
}
It is important to keep the structs on both sides similar in structure and byte size, so that there are no offset issues (you should run tests for this). This means that data is not type safe when sent and retrieved from the GPU, but I still think that partial type safety is much better then none at all, since this leave much fewer avenues for such errors to occur.
Finally to apply the kernel to the data I create this method:
vector Stuff::testCopy(vector &data) {
    GPUMemory mem = utils.createAndFillMemory(data, context, cmd_queue[0]);

    GPUMemory out = GPUMemory(mem.getElements(),context);

    size_t work_size[1];
    work_size[0] = mem.getElements();

    err  = clSetKernelArg(copyParticles,  0,
                          sizeof(cl_mem), mem.getMemoryRef());
    err |= clSetKernelArg(copyParticles,  1,
                          sizeof(cl_mem), out.getMemoryRef());

    if(err != CL_SUCCESS) {
        utils.checkError(err);
        runtime_error("Kernel setup failed");
    }

    // Apply kernel to data
    err = clEnqueueNDRangeKernel(cmd_queue[0], copyParticles,
                                 1, NULL, work_size, NULL, 0,
                                 NULL, NULL);
    if(err != CL_SUCCESS) {
        utils.checkError(err);
        runtime_error("Calculation failed");
    }
    return utils.readBackMemory(out,context, cmd_queue[0]);
}
There are of course problems where these techniques are not suitable or possible, but I use them a lot and they have made my GPU code much more robust. If you have suggestions for improvement or your own small snippets, please add a comment.
Some of my inspiration for this:
Bjarne Stroustrup Going native 2012
The “The question is dumb” checkbox is missing

Normally I do not answer telephone based marketing or marketing research, I try to answer polls though, since I think that spreading my opinion even if it ends up as one hundredth of one percent in a final statistic is slightly useful. What is critical for my participation in such polls though, is that I feel that my opinion is actually represented. Lately I have participated in several polls where the poll is fundamentally flawed and would lead to misleading statistics.
Last night I was asked if I wanted to participate in a poll on politics. Since there was no marketing questions mixed in I said ok. The initial questions were quite normal ones, like “which party did you vote for …”, “which party would you vote for …” and so on.
After a while the questions deteriorated, I do not remember all of them, but one that had me quire frustrated was this:
“Do you think the norwegian government should hire private companies for public tasks?”
To me this question is a a case by case question, there is no single right answer for the different activities a government might undertake. Now the poll does not allow this answer though, it only allows “I do not know” or strong or weak versions of “agree” or “disagree”.
In another poll on an earlier occasion, I was asked:
“Do you think syntethic estrogen is more damaging for aquatic life compared to natural estrogen?”
This question was extremely confusing to me. First of all I do not know if there is a difference between syntethic and natural estrogen (or what is meant by syntethic or natural in the question), secondly the only honest and respectable answer I could give is: “Whatever is the current scientific consensus”. The poll instead has me rating how much I agree or disagree.
I really wonder what the statistics derived from these questions were used for. Which dimwit made a decision based on the “knowlege” gained from it.
I could rant about this all day, but In my opinion rants alone are not good, it is better to propose a solution. What I think would make these polls much better is if there always was a “The question is dumb” checkbox, which had to be included by law, and which also had to be included in the final statistic by law. This way no ones voice is completely misrepresented as mine probably was in these cases.
My experience scraping Disqus
To acquire data for my project mentioned here, I wanted to scrape the comments section of a norwegian newspaper.

Initially I thought it would be as simple as getting the source and applying whatever regular expressions that would give me what I wanted. Sadly it was not that simple.
My chosen norwegian newspaper use Disqus as comment system. Disqus uses javascript quite heavily to generate HTML, this means that the comments are not part of the original source but just exist in the browser DOM. This problem can be solved by using “view generated source” in firefox developer plugin, or by making a plugin for a browser and manipulate the DOM directly. For my problem viewing the generated source was the simpler answer. If I wanted to scrape Disqus often I would make a plugin to dump the generated source.

Sadly this was not the only problem with scraping Disqus. Disqus is configured to only shows a small amount of comments at a time, and to show more a javascript routine must be invoked several times. I just did it a lot of times manually, though again if I really wanted to scrape Disqus based systems a lot, I would automate this step.
Once the I got the data I load it to a java routine which remove unwanted data based on regular expressions (it is faster to access the DOM, I would do that if I had lots of data). Then I generate descriptive parameters (word count, punctuation amount , etc) based on post content. The resulting parameters are stored as JSON. Then the resulting JSON is used as basis for the scatterplots here.
Adding javascript functionality to WordPress posts
Adding your own javascript implementation to posts in your wordpress blog is slightly more difficult then one might think. The difficulties stem from the way WordPress editors format html and javascript in posts. If you just type refer to .js files and then add it by adding some inline script tags, WP will mangle the inline js.
The easiest way to do it is to add the files normally:
<script scr="/path-to-script/cool.js"></script>
Then refer to it using inline script like this:
<script><!--
//Use script here
--></script>
This can of course also be done in several other ways, using WP functionality, but those are all not very satisfactory in my opinion, and they do not fit JS that will only be used in a single post.